Replacing a Device (RMA)
During the reprocessing of kits, some of the devices may be missing or broken and will need to be replaced. Replacement of devices is done on the reprocessing checklist. Each device in the kit has the option for Missing, Present, or Unsatisfactory. When a device is lost or has physical damage, you can select the option and scan or type a new serial number.
Replacing a device in a kit
- In the menu, click Logistics > Reprocess.
The Reprocess list page appears.
- Click the kit number with the RMA device(s).
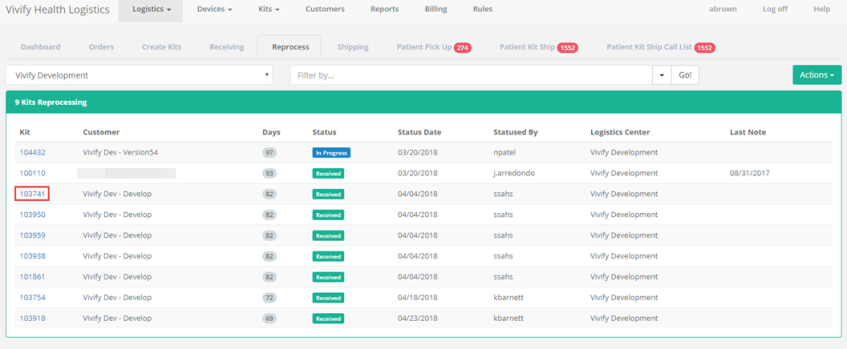
The list of kit contents appears in the Devices section.
- In the Actions menu, click In Progress.
- In the Actions menu or on the page, click Open Checklist.
The Kit Reprocessing Checklist appears.
- In the Receiving area, for the component you want to replace, select Missing or Unsat.
If the device is Then Missing 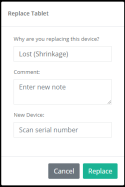
The Replace Device window appears.
- In the Why are you replacing this device list, click Lost (Shrinkage) or Purchased. Lost indicates that the device was not returned with the kit. Purchased means the patient or Care Team has paid for the device and it will not be returned.
- In the Comment box, type any notes that apply to this device, such as feedback from the patient about the device purchase or loss.
- In the New Device box, scan or type the serial number of the new device. If the serial number entered does not match a device, then an error message will appear.
Broken or needs repairs 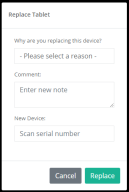
The Replace Device window appears.
- In the Why are you replacing this device list, click QA Check (Devices Only), Physical Damage (Shrinkage), or Purchased. Lost indicates that the device was not returned with the kit. Purchased means the patient or Care Team has paid for the device and it will not be returned. QA check means the device needs further review by quality assurance.
- In the Comment box, type any notes that apply to this device, such as feedback from the patient about the device purchase or loss.
- In the New Device box, scan or type the serial number of the new device. If the serial number entered does not match a device, then an error message will appear.
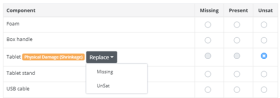
The checklist is updated with the reason for replacing the device and a Replace button appears. The Replace button is only used if the device needs to be replaced again. For more information about replacing a device that has already been replaced, see Replacing a device that has already been replaced
- Complete the checklist as described in Kit Reprocessing Checklist.
Replacing a device that has already been replaced
- In the Reprocessing Checklist, in the row of the component you want to replace, click the Replace button, and then click Missing or Unsat.
The Replace window appears.
- In the window, do the following:
- In the Why are you replacing this device list, click Lost (Shrinkage), Purchased, or QA Check (Devices Only). Lost indicates that the device was not returned with the kit. Purchased means the patient or Care Team has paid for the device and it will not be returned. QA check means the device needs further review by quality assurance.
- In the Comment box, type any notes that apply to this device, such as feedback from the patient about the device purchase or loss.
- In the New Device box, scan or type the serial number of the new device. If the serial number entered does not match a device, then an error message will appear.
- Click Replace.
The checklist is updated with the reason for replacing the device. This allows technicians to fix errors and replace a device that was added while being broken. An additional replacement is shown on shrinkage as the latest item, while the intermediate item is not. Only one replace line on the shrinkage report appears, so the customer is only billed once.
- If the rest of the checklist is complete, click Save & Complete. If you want to save your progress without marking the checklist as complete, click Save.
 Yes
Yes  No
No